
How To Set Up FTP Over TLS / SSL With Centos Web Panel
Posted by The Curious Website Designer | Posted on Fri 21 Dec 2018

TLS and SSL is a means of encrypting data, using a public/private key combination set. This is the same technology that is used to bring secure web browsing (HTTPS) on the web.
Using FTP over TLS is basically the same thing. FTPeS uses the same type of technology to encrypt your login credentials as you log into the FTP server.
This prevents anything that might be listening on your connection from reading your username and password whereas regular FTP will pass this information across your connection in plain text, so if someone was 'sniffing' your connection, they could easily attain your username and password.
This article explains how to 'switch it on' in a Centos Web Panel installation. Much of this article has been copied from the excellent article How to configure PureFTPd and FileZilla to use TLS sessions on CentOS 7.2 by the guys at HowTo Forge Linux Tutorials so I want to make clear that I can not (and nor do I wish to) claim credit for the information contained here.
Step 1. Configure Pure-FTPd
Open up a PuTTY session to your server and enter:
Scroll down and find:
- TLS 1
This may be set to a different number.. 0 means TLS is not enabled, 1 means that the server will accept TLS or plain FTP (no encryption) and 2 means that the server will refuse connections that don't use SSL/TLS security mechanisms. Set the number to either 1 or 2.
Next, check the file for the following entries and add them if they are not there:
- TLSCipherSuite HIGH
- CertFile /etc/ssl/private/pure-ftpd.pem
- PassivePortRange 30000 50000
Enter Shift ZZ to save the file.
Step 2. Create The SSL Certificate For TLS
In order to use TLS we need to create an SSL Certificate. You can see from the entries above that we have set the 'CertFile' as /etc/ssl/private/pure-ftpd.pem. This is the default location for a new installation of Pure-FTPd, so I'm sticking with that.
In my installations of CWP, the folder doesn't exist, so it needs to be created:
Next we create the actual certificate. This will be valid for 20 years (7300 days). You can change this if you wish.:
You will be asked to enter the following details:
Country Name (2 letter code) [XX]: --> Enter your Country Name (e.g., "GB").
State or Province Name (full name) []:--> Enter your State or Province Name.
Locality Name (eg, city) [Default City]:--> Enter your City.
Organization Name (eg, company) [Default Company Ltd]:--> Enter your Organization Name (e.g., the name of your company).
Organizational Unit Name (eg, section) []:--> Enter your Organizational Unit Name (e.g. "IT Department").
Common Name (eg, your name or your server's hostname) []:--> Enter the Fully Qualified Domain Name of the system (e.g. "server1.example.com").
Email Address []:--> Enter your Email Address.
Next, we change the permissions of the certificate file:
And then we restart Pure-FTPd
We can now exit out of PuTTY.
Step 3. Update The Firewall Settings
Earlier we added an entry to the Pure-FTPd configuration file:
- PassivePortRange 30000 50000
We need to add this range to the firewall. From the server Control Panel select Security > CSF Firewall.
Click on the button Firewall Configuration.
Find:
- # Allow incoming TCP ports
- TCP_IN = "20,21,22,25,53,80,110,143,443,465,587,993,995,2030,2031,2082,2083,2086,2087,2095,2096,2304"
- # Allow outgoing TCP ports
- TCP_OUT = "20,21,22,25,53,80,110,113,443,2030,2031,2082,2083,2086,2087,2095,2096,587,993,995,2304"
and change to:
- # Allow incoming TCP ports
- TCP_IN = "20,21,22,25,53,80,110,143,443,465,587,993,995,2030,2031,2082,2083,2086,2087,2095,2096,2304,30000:50000"
- # Allow outgoing TCP ports
- TCP_OUT = "20,21,22,25,53,80,110,113,443,2030,2031,2082,2083,2086,2087,2095,2096,587,993,995,2304,30000:50000"
Save the file and restart the Firewall.
Step 4. Set Up Filezilla
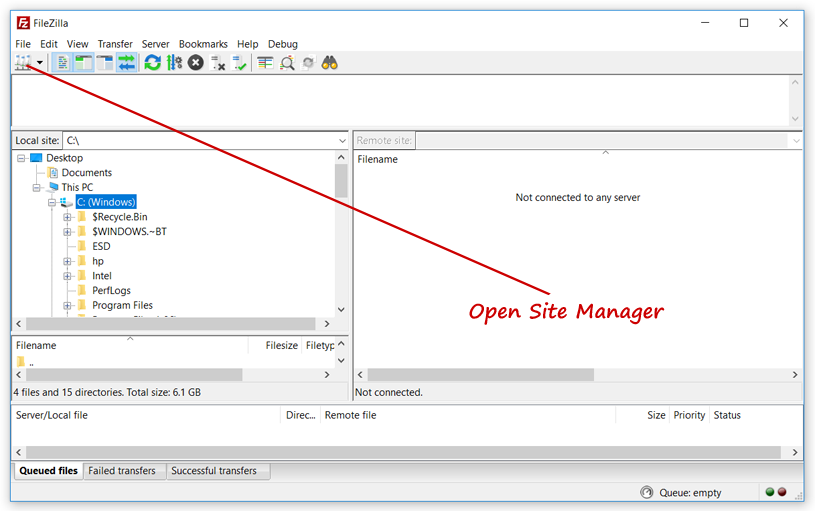
Fire up Filezilla and open the Site Manager:
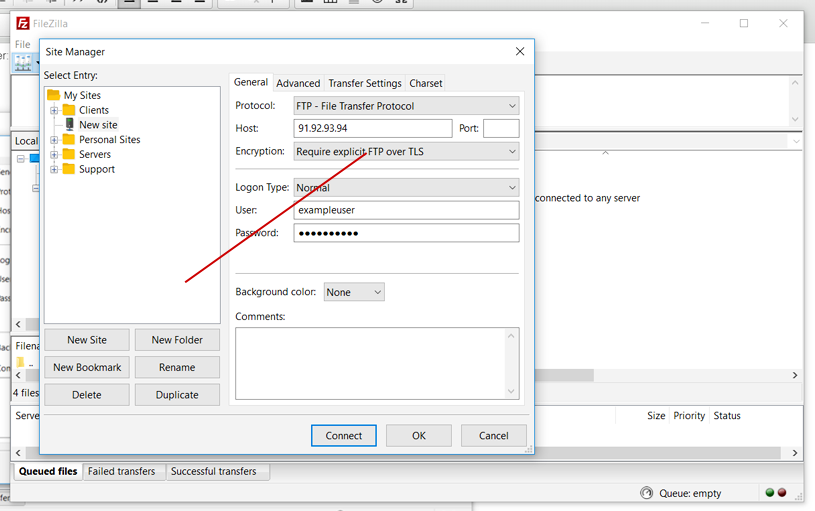
Choose the site that you want to edit and set the Encryption to 'Require Explicit FTP over TLS'
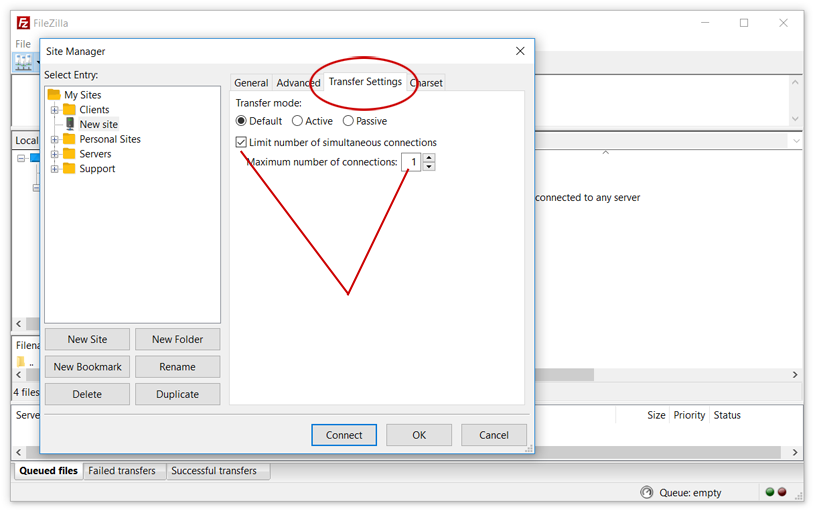
Click on the Transfer Settings tab, tick the box to Limit number of simultaneous connections and set this to 1 or 2 to prevent CWP from locking you out because there are too many open connections.
And that's it. Good luck !