
How To Use Secure Copy (SCP) To Copy Files From One Server To Another
Posted by The Curious Website Designer | Posted on Mon 11 Jun 2018

This article shows how to remotely copy backup files from one server to another using 'Secure Copy' (SCP) and without having to manually enter a password each time.
I will write another article in a few weeks time to show how I generate my backup files.
I maintain a VPS with all my clients websites which gives me complete control over management of the data. However, with that freedom and flexibility comes the responsibility of making sure that the data is never lost.
So I procured a second VPS in a different data centre in order to safely backup all the files.
Now, I don't want to have to sit down and manually create backups every day, so the answer is to automate the process. I use CRON to first create a backup file and then copy the backup files to my backup server.
Local Machine vs Remote
While researching various subjects related to the use of servers, many resources discuss the 'local' server and the 'remote' server. For years (and I do mean years), I have always understood local to mean physically local ie. in the living room, bedroom or office etc. Doh !
Just in case there are others like me who do not get this concept, the local machine is the one where the command or script is being run. It could be a server on the other side of the world - it really doesn't matter. The remote server is the one that is being connected to by the local server. And that could be in a building next door.
So keep that in mind . . .
What is Secure Copy ?
Secure Copy (SCP) is a shell / bash command that allows you to securely copy files from one server to another using SSH (secure shell). You can copy either way ie. you can copy from the local server or you can copy to the local server. Just remember that the local server is the one where the command is being run.
The syntax to use is:
or
The -P22 in the command tells scp to use port 22 which is the default port for ssh (Note that it is a captial P and not lower case). In this case, you can leave that element out of the command. But if you have changed the port number for ssh (it's good practise to do so), then you should leave it in, but change the number 22 to the relevant port number.
When the Source Server is the Local Machine:
When the Destination Server is the Local Machine:
$ scp -P22 live@remote-server.com:~/source_folder/backup-file.tar.gz ~/destination_folder/backup-file.tar.gz
The second (shorter) command on the destination server example does exactly the same thing as the first command - the tilde ( ~ ) tells scp to start from the root folder of the relevant user account. If you're ever not sure about which folder scp will work with, the safest option is to put the full path (as shown in the first command).
Usually, though, if you used any of these commands you will be prompted to enter a password for the 'other' user account. If we want to do this remotely and unattended we need a workaround. Thankfully there is one !
So How To Use SCP Without Having To Enter A Password ?
Step 1. Generate a Public and Private Key Pair
We need to create a public and private key pair. We do this on the local server (the one where the backup or copy script is going to be run).
The following example assumes I am going to backup files from the account 'live' on the local server and send them to the user account 'backup' on the remote server.
Open a PuTTY session logging in to the user account from which you want to run Secure Copy (user 'live' on the local server [cloudserver2]) and enter the following command:
The -t means type and the type is RSA. There are other key pair types, but RSA is generally considered to be the most secure.
You will be asked to confirm where you would like to save the file:
- [live@cloudserver2 ~]$ ssh-keygen -t rsa
- Generating public/private rsa key pair.
- Enter file in which to save the key (/home/live/.ssh/id_rsa):
Press the Enter key.
If the files already exist, you will prompted to confirm you wish to overwrite them:
- [live@cloudserver2 ~]$ ssh-keygen -t rsa
- Generating public/private rsa key pair.
- Enter file in which to save the key (/home/live/.ssh/id_rsa):
- /home/live/.ssh/id_rsa already exists.
- Overwrite (y/n)?
Press n then Enter and go straight to Step 2.
If the files don't already exist, you will be asked to enter a passphrase:
- [live@cloudserver2 ~]$ ssh-keygen -t rsa
- Generating public/private rsa key pair.
- Enter file in which to save the key (/home/live/.ssh/id_rsa):
- Created directory '/home/live/.ssh'.
- Enter passphrase (empty for no passphrase):
Leave this empty or your command or script or command will pause and prompt you for the passphrase each time. Just press the Enter key again .
You'll be prompted to enter the same passphrase again, so press the Enter key again.
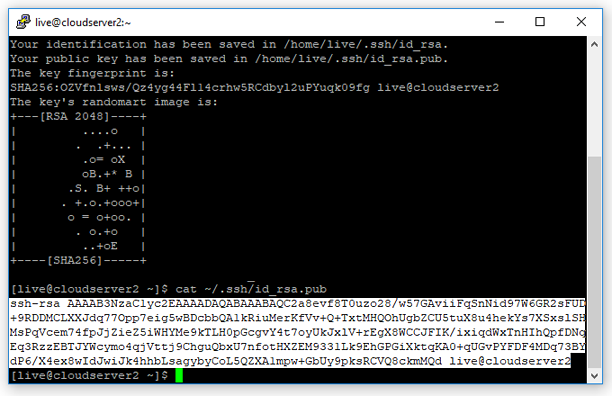
You will get something along the lines of:
- [live@cloudserver2 ~]$ ssh-keygen -t rsa
- Generating public/private rsa key pair.
- Enter file in which to save the key (/home/live/.ssh/id_rsa):
- Created directory '/home/live/.ssh'.
- Enter passphrase (empty for no passphrase):
- Enter same passphrase again:
- Your identification has been saved in /home/live/.ssh/id_rsa.
- Your public key has been saved in /home/live/.ssh/id_rsa.pub.
- The key fingerprint is:
- SHA256:OZVfnlsws/Qz4yg44Fl14crhw5RCdbyl2uPYuqk09fg live@cloudserver2
- The key's randomart image is:
- +---[RSA 2048]----+
- | ....o |
- | . .+... |
- | .o= oX |
- | oB.+* B |
- | .S. B+ ++o|
- | . +.o.+ooo+|
- | o = o+oo. |
- | . o.+o |
- | ..+oE |
- +----[SHA256]-----+
- [live@cloudserver2 ~]$
You now have 2 files id_rsa (the private key) and id_rsa.pub (the public key) in the folder .ssh which is a sub of the root folder of this user (ie /home/user/.ssh).
Step 2. Copy the Public Key to the Remote Server
We must now copy the contents of the public key id_rsa.pub to the file authorized_keys in the folder .ssh on the remote machine.
First, though, we're going to copy the contents of id_rsa.pub to the clipboard. In the same PuTTY session enter:
You will get something along the lines of:
- ssh-rsa AAAAB3NzaC1yc2EAAAADAQABAAABAQC2a8evf8T0uzo28/w57GAviiFqSnNid97W6GR2sFUD+9RDDM
- CLXXJdq77Opp7eig5wBDcbbQA1kRiuMerKfVv+Q+TxtMHQOhUgbZCU5tuX8u4hekYs7XSxslSHMsPqVcem74fpJj
- ZieZ5iWHYMe9kTLH0pGcgvY4t7oyUkJxlV+rEgX8WCCJFIK/ixiqdWxTnHIhQpfDNqEq3RzzEBTJYWcymo4qjVtt
- j9ChguQbxU7nfotHXZEM9331Lk9EhGPGiXktqKA0+qUGvPYFDF4MDq73BYdP6/X4ex8wIdJwiJk4hhbLsagybyCo
- L5QZXA1mpw+GbUy9pksRCVQ8ckmMQd live@cloudserver2
Using the mouse, select the whole contents of the file (from ssh-rsa to live@cloudserver2). It should look like this:
There is no need to press CTRL-C, simply selecting the text automatically copies it to the clipboard. That's it for now, we will come back to it shortly.
Next enter:
Again we indicate the port number, but note that the -p is lowercase this time.
- [live@cloudserver2 ~]$ ssh -p22 backup@remote-server.com
- ssh: connect to host remote-server.com port 22: Connection refused
If the connection is refused (as shown above), you must add the IP Address of each other's' server in the firewall whitelist for both the remote and local server. Having done that, I tried again:
- [live@cloudserver2 ~]$ ssh -p22 backup@remote-server.com
- The authenticity of host '[remote-server.com]:22 ([80.211.168.92]:22)' can't be established.
- ECDSA key fingerprint is SHA256:WUWIGkrttAH/ZJKs4e5Z/eaaHSe/6wQnognrvNKMg5M.
- ECDSA key fingerprint is MD5:b9:7e:77:61:c8:55:2e:d3:f5:ec:d8:57:6d:f3:45:39.
- Are you sure you want to continue connecting (yes/no)?
If this is the first time you've connected from the local server, it won't be recognised, and you will be asked if you want to continue connecting. Type yes (not just y) and press Enter.
- [live@cloudserver2 ~]$ ssh -p22 backup@80.211.168.92
- The authenticity of host '[remote-server.com]:22 ([80.211.168.92]:22)' can't be established.
- ECDSA key fingerprint is SHA256:WUWIGkrttAH/ZJKs4e5Z/eaaHSe/6wQnognrvNKMg5M.
- ECDSA key fingerprint is MD5:b9:7e:77:61:c8:55:2e:d3:f5:ec:d8:57:6d:f3:45:39.
- Are you sure you want to continue connecting (yes/no)? yes
- Warning: Permanently added '[remote-server.com]:22' (ECDSA) to the list of known hosts.
- backup@remote-server.com's password:
The remote server will be added to the local servers known hosts file (so you're not prompted the next time) and then you will be asked to enter the password for the user 'backup' on the remote server. Enter this correctly and you will be logged in to the remote server.
- [live@cloudserver2 ~]$ ssh -p22 backup@remote-server.com
- The authenticity of host '[remote-server.com]:22 ([80.211.168.92]:22)' can't be established.
- ECDSA key fingerprint is SHA256:WUWIGkrttAH/ZJKs4e5Z/eaaHSe/6wQnognrvNKMg5M.
- ECDSA key fingerprint is MD5:b9:7e:77:61:c8:55:2e:d3:f5:ec:d8:57:6d:f3:45:39.
- Are you sure you want to continue connecting (yes/no)? yes
- Warning: Permanently added '[remote-server.com]:22' (ECDSA) to the list of known hosts.
- backup@remote-server.com's password:
- [backup@svr ~]$
Note that the prompt has changed from live@cloudserver2 to backup@svr.
What we are going to do here is to check to see if the authorised public keys file has already been created. If it has, we'll add the public key for our live server. If not we'll create the file first then add the public key.
So first we'll check for the folder .ssh
This gives us a directory listing.
- [backup@svr ~]$ ls -al
- total 24
- drwx------. 2 backup backup 4096 May 30 17:17 .
- drwx--x--x. 6 root root 4096 May 26 17:07 ..
- -rw-------. 1 backup backup 119 May 26 17:15 .bash_history
- -rw-r--r--. 1 backup backup 18 Apr 11 01:53 .bash_logout
- -rw-r--r--. 1 backup backup 193 Apr 11 01:53 .bash_profile
- -rw-r--r--. 1 backup backup 231 Apr 11 01:53 .bashrc
- [backup@svr ~]$
In this case, the folder .ssh doesn't exist, so we need to create it and check it exists:
$ ls -al
- [backup@svr ~]$ mkdir .ssh
- [backup@svr ~]$ ls -al
- total 28
- drwx------. 3 backup backup 4096 May 30 17:17 .
- drwx--x--x. 6 root root 4096 May 26 17:07 ..
- -rw-------. 1 backup backup 119 May 26 17:15 .bash_history
- -rw-r--r--. 1 backup backup 18 Apr 11 01:53 .bash_logout
- -rw-r--r--. 1 backup backup 193 Apr 11 01:53 .bash_profile
- -rw-r--r--. 1 backup backup 231 Apr 11 01:53 .bashrc
- drwxr-xr-x. 2 backup backup 4096 May 30 17:17 .ssh
- [backup@svr ~]$
We can see that the .ssh folder now exists, so we'll move into it and check what files there are:
$ ls -al
- [backup@svr ~]$ cd .ssh
- [backup@svr .ssh]$ ls -al
- total 8
- drwxr-xr-x. 2 backup backup 4096 May 30 17:17 .
- drwx------. 3 backup backup 4096 May 30 17:17 ..
- [backup@svr .ssh]$
In this case the authorized_keys file does not exist (note the americanised spelling - this is very important), but even if it does exist, we will use the same command to edit it:
Press the i key to move to Insert mode then if the file is empty, make sure the mouse cursor is positioned inside the Terminal / PuTTY window and right-click. This should paste the public key content that we copied earlier.
If the file is not empty, then select Insert mode by pressing the i key then use the arrow keys to move the green cursor to the end of the last line of the file, press Enter to start a new line and then right-click the mouse. This will add the public key data to the end of the file.
In either case, then press the ESC key followed by SHIFT + ZZ to save the file.?
Next we type exit to return to the 'live' server.
Finally, we test that we can send a file without having to enter a password. I have a backup file (backup-file.tar.gz) in the folder 'backups' on my live server and I want to send it to the folder 'remote-backups' on the backup server. The command I used is:
- [live@cloudserver2 ~]$ scp -P22 ~/backups/backup-file.tar.gz backup@remote-server.com:~/remote-backups
- backup-file.tar.gz 100% 606MB 70.2MB/s 00:08
- [live@cloudserver2 backups]$
And we can check that it has arrived successfully by entering the following:
- [live@cloudserver2 backups]$ ssh -p47257 backup@remote-server.com
- Last login: Mon Jun 11 10:25:44 2018 from 80.211.53.178
- [backup@svr ~]$ cd remote-backups
- [backup@svr remote-backups]$ ls -al
- total 620064
- drwxr-xr-x. 2 backup backup 4096 Jun 11 10:28 .
- drwx------. 4 backup backup 4096 Jun 11 10:26 ..
- -rw-r--r--. 1 backup backup 634930659 Jun 11 10:28 backup-file.tar.gz
- [backup@svr remote-backups]$
I hope you have found this article useful. In the next few weeks, I will try to put together another article that outlines the scripts I use to automate my daily backup schedule.
Related Articles
How To Set Up Your Nameservers On Separate VPS's (Centos Web Panel)
")
Posted by: The Curious Website Designer
on Sat 29 Dec 2018
I have two seperate VPS server setups each with one public ip address. One is my main production server and the other is used as an offsite disaster backup. In this article, I will show you how I set up the DNS server so that ns1 is on the production server, ns2 is on the backup server and how I keep the DNS information synchronised.
Tags: secure copy, scp, backup, backups, backing up, transfer files