
How To Use PuTTY to Access Your Server Using SSH
Posted by The Curious Website Designer | Posted on Mon 20 Mar 2017 | Updated on Sat 15 Apr 2017
If you have never used SSH to access your VPS, you will probably never have come across PuTTY.
This article will put that situation right.
This is the first in a series of 4 articles aimed at guiding newcomers to server management through the process of preparing and setting up a brand new vps server. They full series covers:
- How To Use PuTTY to Access Your Server Using SSH
- Basic Security Measures
- Installing Centos Web Panel
- Initial Web Panel Configuration Settings
If you are familiar with connecting to your server via a SSH connection, then feel free to move on to the next section which covers basic security measures to take before installing a Web Control Panel.
SSH stands for Secure Shell and it's a network protocol that provides administrators with a secure way to access a remote computer. I have a Windows PC and I will be using a program called PuTTY to make the connection. PuTTY seems to be the most popular application for this and it can be downloaded from here https://www.chiark.greenend.org.uk/~sgtatham/putty/latest.html. Mac users would normally use Terminal which is built into MacOS.
So what are you waiting for ? If you haven't already done so, click the link, download and install this great tool !
1. Logging In With PuTTY
Once you've installed PuTTY onto your PC, open it up and you'll get the following dialog:
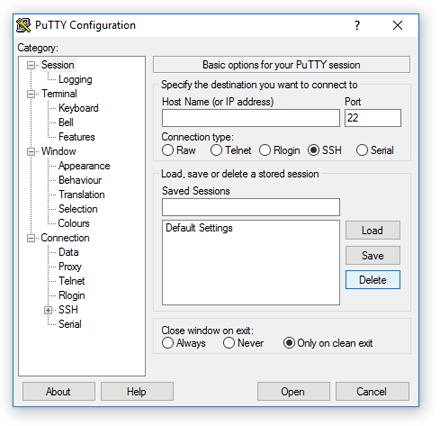
In the section Host Name (or IP address) enter the IP address of your server. Leave the Port at 22 as this is the normal port to use for connecting with SSH. Make sure the Connection type is set to SSH (it should be already be set to this as it is the default setting).
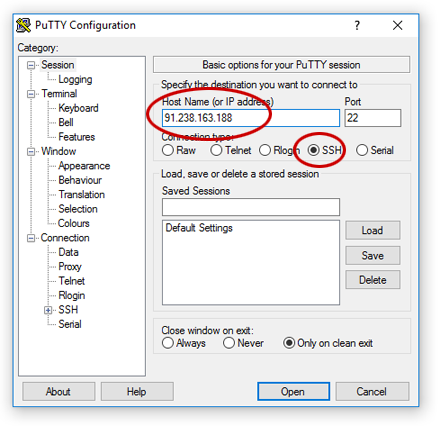
Click the 'Open?' button and the dialog will close and a new console window will open:
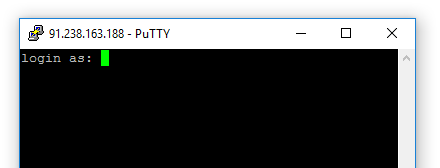
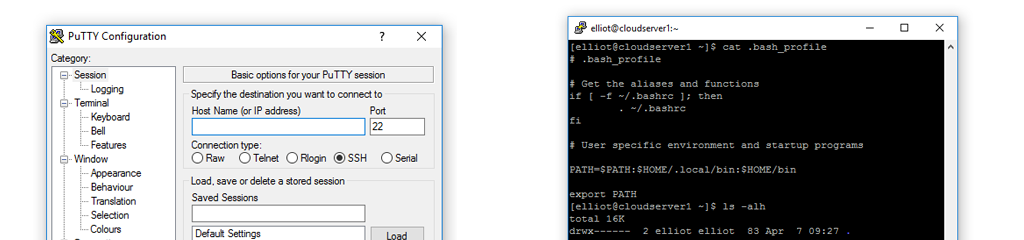
At the prompt, enter the username given to you by your hosting provider (usually root):
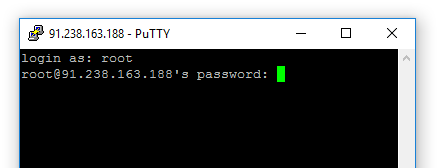
You'll be prompted for the password. It get's a little weird here.
Carefully enter the password given to you by your hosting provider - the cursor doesn't move while you do this. You can use the backspace key if you make a mistake, but you have to keep track of what characters you're deleting. But don't worry if you get it wrong, you get an access denied message and you are prompted to try again.
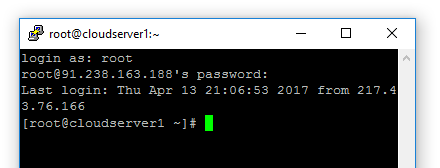
When you've successfully entered the password, you're logged in and you get the prompt character. It's a '#' in this case because I've logged in as root (root is a superuser that has the most permissions - but do beware, that also means that it can do the most damage !). If you log in as a 'regular' user, the prompt character is a '$'. You'll be doing this later on in the series.
You will often see tutorials and guides showing a command beginning with a # or a $. Now you know why.
There is a useful quick reference guide (in .pdf format) to some of the commands you might need to use here. We'll be putting some of those into practice in the next articles.
2. Copying and Pasting in PuTTY
It is possible to copy and paste in PuTTY (as I eventually found out !), but it's not the Ctrl + C & Ctrl + V arrangement that most of us are familiar with.
To copy text from the console, simply select it by clicking and dragging the mouse. That's it ! The selected text is automatically added to clipboard and you can then go into Notepad++ or any other application and use Ctrl + V to paste it.
To copy FROM Notepad++, a web page etc. copy as you usually do (select the text then Ctrl + C), then move the mouse cursor into the PuTTY console window and right-click. It takes a little while, but you soon get used to it.
3. PuTTY Shortcuts
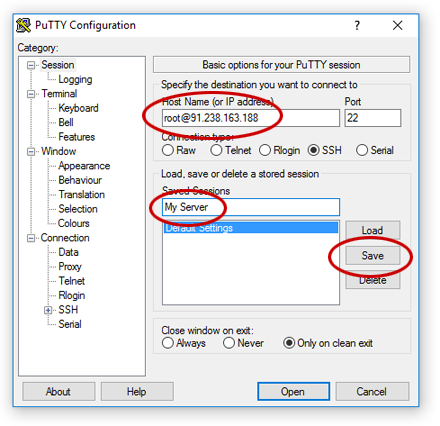
To make it slightly quicker to log in, you can combine the username and IP address as shown in the next image. And to save having to type in the details each time you login, you can save the details by giving the connection a name and clicking the 'Save' button.
Next time you want to log in, click the connection you want to use and click the 'Load' button to 'fill in' the login details and then click the 'Open' button.
And one final thing to note, you can have more than one PuTTY window open at the same time - we'll be doing this in the next article.
The next article covers Basic Security Measures For Setting Up A CentOS 7 Server.
Related Articles
Basic Security Measures For Setting Up A CentOS 7 Server

Posted by: Phil Brighton
on Fri 24 Mar 2017
This is number 2 in a series of 4 articles designed to help newbies (like myself) get to grips with managing your own VPS server when you have never done it before. In this article, I'm going to show you some basic security measures you should take before doing anything else with your newly obtained VPS server.
How To Install Centos Web Panel (CWP) On A Centos 7 Server
 On A Centos 7 Server")
Posted by: The Curious Website Designer
on Thu 30 Mar 2017
This is the third in a series of 4 articles aimed at server administrators who have very limited experience. In this article, I will explain how to install CWP on server with Centos 7. The final article will focus on initial configuration of the Web Panel
Centos Web Panel - Basic Configuration

Posted by: The Curious Website Designer
on Sun 9 Apr 2017
So you've just installed the latest version of Centos Web Panel and it all looks lovely . . . but what do you do next ? This is the fourth and final piece in a series of articles aimed at helping newcomers set up a VPS for the first time. This article will walk you through the basic configuration settings you need to change to allow you to get your website(s) up and running once you have installed CWP.
How To Migrate a User From cPanel To Centos Web Panel

Posted by: The Curious Website Designer
on Sat 15 Apr 2017
So, you've finally got your VPS set up and Centos Web Panel is installed and ready to go - you're now faced with transferring over all of your user accounts from cPanel. CWP comes with a bundled cPanel migration tool which does a pretty good job of transferring over the data, but unfortunately it's not a straightforward case of upload a backup file and click a button. In this article, I'm going to take you through the actual steps you need to take to migrate an account from cPanel to CWP
Troubleshooting Problems With Centos Web Panel
Posted by: The Curious Website Designer
on Mon 24 Apr 2017
The range and diversity of potential problems and errors with Centos (or any other) Web Panel is so great, that this article could never hope to come close to giving you all of the answers you may be looking for. In most cases, when something goes wrong - it just goes wrong! The clues, though, can usually be found in the error logs. But where on earth are they ? The purpose of this article is to not only help you find where they are, but also to provide you with a way of keeping them close at hand.