
Basic Security Measures For Setting Up A CentOS 7 Server
Posted by Phil Brighton | Posted on Fri 24 Mar 2017

This is number 2 in a series of 4 articles designed to help newbies (like myself) get to grips with managing your own VPS server when you have never done it before.
In this article, I'm going to show you some basic security measures you should take before doing anything else with your newly obtained VPS server.
Having signed up to a VPS Cloud Server account with HostPresto!, I am working with a server that has CentOS 7.x with 1Gb of RAM installed and 25 Gb of disk space - but nothing else. It's a very low end VPS package, which I've obtained while I learn how to be a proper server administrator, so it suits my needs for now. I can always add more disk space and RAM as I need it.
I will be installing the free CentOS Web Panel a little later in this series of articles, but before I do that, I'm going to take a few basic security measures to reduce the risk of someone getting unauthorised access to my server.
Step 1. Log in via a SSH connection.
SSH stands for Secure Shell and it's a network protocol that provides administrators with a secure way to access a remote computer. I have a Windows PC and I will be using a program called PuTTY to make the connection. If you're not familiar with PuTTY, you should read this article.
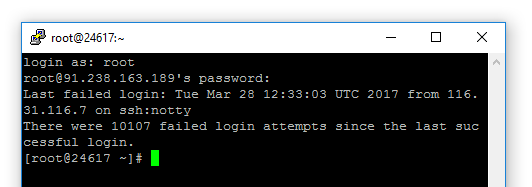
Your Hosting Provider will normally send you the username (usually root) and IP address for your new server. Login using these details using PuTTY (Mac users would normally use a program called Terminal which does the same thing on MacOS as PutTTY does on Windows).
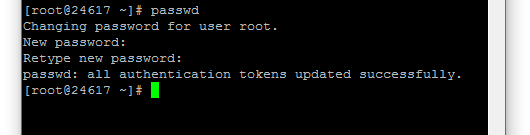
Step 2. Change the Default Password For 'root'.
In the console window type:
then press enter. Note the spelling - this is important.
You will be asked to enter a new password (twice) to ensure you have typed it correctly. Note: the cursor doesn't move when you're typing in passwords so make sure you type carefully !
Use a mixture of capitals, lower case, numbers and symbols (@, -, ! etc). I tend to go for a mix of vehicle registration numbers and telephone numbers or partial telephone numbers separated by the special characters. Make the password strong, because this is the gateway to your server and you really don't want some vagrant squatting on your server (or worse). Did you notice how many failed login attempts there have been in the space of a day or so in the previous image !
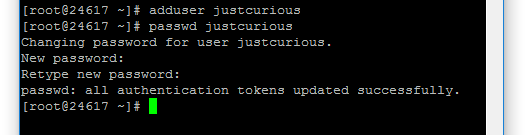
Step 3. Create a New User.
Username is one half of the first level of security guarding access to your server, and every man and his dog knows about 'root' (well the bad guys who want to break in and either steal from you or do damage to your websites certainly do !), so it's good practise to create a new user and give them root privileges so you can lock out anyone (including yourself) who may want to log in under the username 'root'.
So, enter :
and press Enter. Obviously, you will need to change newuser for the actual username you want to use. On the console, the cursor simply moves down one line - there's no message to say the new user has been created (or how well you've done !) so don't be disconcerted by that (as I was at first).
Although you can use fullstops, underscores and hyphens in usernames (as long as the username doesn't start with a hyphen), I would personally avoid this and stick to a-z, A-Z and 0-9. I'd also maintain a convention of either uppercase only or lowercase only - it just keeps things standard.
Next we need to give the user a password, so enter:
Again you will need to enter the password twice. And again the cursor won't move as you're typing the password.
Step 4. Give the New User Root Privileges.
Next we enter:
Now this user can execute comands as a superuser. More on that later !
Step 5. Edit the SSH Default Port and Disable Access to User 'root'.
The next thing to do is edit the SSHD configuration file in order to add some more security measures.
We are going to be using Vi which is a VERY basic text editor. Pronounced (vee-aye), it stands for 'visual instrument'. Before we get on to the task of editing the file though, you should familiarise yourself with the way vi works - it's not at all intuitive.
There is a useful Quick Reference Guide here which I copied from lagmonster.org. I found that I could navigate around the text editor using the arrow keys and delete by using the backspace, so I only really needed to know about 'Modes' and 'Quitting', but all of the functions are shown if the backspace and / or arrow keys don't work for you.
So now that we're experts (!) on vi, lets get editing the SSHD configuration file.
On the command line, enter:
Using the cursor keys, find:
- #Port 22
Position your cursor on that line and press the i key. Note that the word 'INSERT' appears at the bottom of the window.
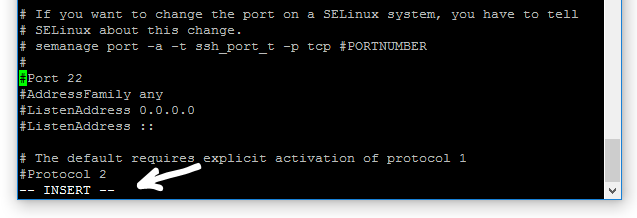
Remove the '#' and change the port number. You can use any number in the range 1025 to 65535
Note: I got strange results using the numeric keypad on my keyboard when using vi, so I had to use the number keys above the top row of letters.
Next we're going to disable 'root' login. Using the cursor keys, find:
- PermitRootLogin yes
and change this to without-password if you want to be able to access the root user using SSH-Key authentication, or no if you don't.
Then find:
- #UseDNS yes
Remove the '#' and change to no.
Next, we're going to correct a problem that occurs when uploading files using FTP.
Find:
- Subsystem sftp /usr/libexec/openssh/sftp-server
and replace with:
- Subsystem sftp /usr/libexec/openssh/sftp-server -u 022
Press ESC to return to 'command' mode, then press Shift + ZZ to save and exit the configuration file.
If you check back to the previous image, you will see that just above the 'Port 22' entry, there is a message that if we change the port, we must tell SELinux about the change. (Security-Enhanced Linux (SELinux) is a Linux kernel security module). Helpfully, it tells us the command we should use.
So, if you changed the Port number to (for example) 45678, you would now enter the command:
You can check that the configuration has worked correctly by entering:
If it has worked as it should, you should see something along the lines of:
- ssh_port_t tcp 45678, 22
Now restart the SSHD service:
Do not close the SSH connection window yet! We must check that we can log in on the new port first.
Step 6. Check That Your New Username is Working Correctly.
Open a new instance of PuTTY and login as newuser (you will now have two separate windows running). Don't forget to update the port number to the one you have just set.
To check that newuser has root access rights, enter:
You will be prompted for a password. The password that is required is the 'root' password.
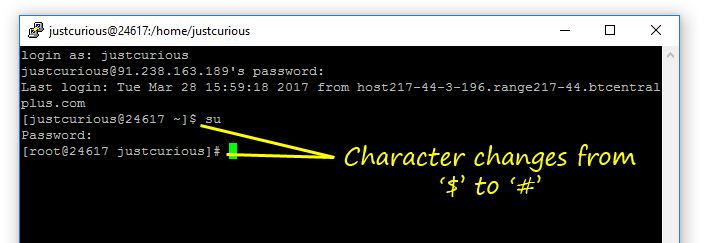
On successful login, the prompt character changes from a '$' to a '#'. This means that your newuser has superuser privileges.
Enter:
to return to normal privileges (the prompt character becomes a '$' once more), then
again to close the SSH window.
Open another new instance of PuTTY and log in as user 'root'.
After entering the correct password, you should get the error message:
- Access Denied.
If that is the case, then you have created a new user with access to root privileges, and have prevented anyone logging in directly as root.
You can now close the PuTTY window(s) and either get yourself a well earned cup of coffee, or carry on to the the next stage of getting your server ready for hosting websites.
The next article in this series covers the installation of Centos Web Panel, a popular, free, feature rich web hosting control panel.
Related Articles
How To Use PuTTY to Access Your Server Using SSH

Posted by: The Curious Website Designer
on Mon 20 Mar 2017
If you have never used SSH to access your VPS, you will probably never have come across PuTTY. This article will put that situation right.
How To Install Centos Web Panel (CWP) On A Centos 7 Server
 On A Centos 7 Server")
Posted by: The Curious Website Designer
on Thu 30 Mar 2017
This is the third in a series of 4 articles aimed at server administrators who have very limited experience. In this article, I will explain how to install CWP on server with Centos 7. The final article will focus on initial configuration of the Web Panel
Centos Web Panel - Basic Configuration

Posted by: The Curious Website Designer
on Sun 9 Apr 2017
So you've just installed the latest version of Centos Web Panel and it all looks lovely . . . but what do you do next ? This is the fourth and final piece in a series of articles aimed at helping newcomers set up a VPS for the first time. This article will walk you through the basic configuration settings you need to change to allow you to get your website(s) up and running once you have installed CWP.
Tags: newbie, server, vps, vps server, security, server security, security measures, Centos7, Centos 7