
Centos Web Panel - Basic Configuration
Posted by The Curious Website Designer | Posted on Sun 9 Apr 2017
So you've just installed the latest version of Centos Web Panel and it all looks lovely . . . but what do you do next ?
This is the fourth and final piece in a series of articles aimed at helping newcomers set up a VPS for the first time. This article will walk you through the basic configuration settings you need to change to allow you to get your website(s) up and running once you have installed CWP.
1. Set Root Email
The first thing you will notice when you log in to your freshly installed Centos Web Panel is the orange warning to 'Set Root Email'. That's as good a place to start as any, so click the button or using the menu on the left of the screen, click CWP Settings > Edit Settings.
Change the Root Email to a live email address - it doesn't have to be one that is or will be hosted by your new VPS server, so a gMail or other address will be fine.
You can choose to forward root emails or not. I don't because I don't want my inbox cluttered up by server generated emails, but it's up to you - you may want to set it to yes (ticked) for a week or two to see what emails you get - you can always return later to switch it off.
2. Set Up At Least One User Account
You will need a domain name for this.
In your CWP control panel, click on Packages > List Packages. You will see that there is a default package already set up.
If this will not meet your needs for your domain, then create an additional package (or packages) that meet your requirements by clicking on Packages > Add a Package.
Once you have the package(s) you require, click on User Accounts > New Account and complete the details as appropriate. Make sure you make a note of the username and password because these will be used to login to the client Control Panel.
Make sure the email address is the one you want forgotten password details sent to.
When you're satisfied the details are all correct, click the Create button.
3. Set Up DNS Records
It is possible to set up your own nameserver especially if you have more than one ip address associated with your vps (or you have more than one vps package), but for this article, we're going to use the bundled FreeDNS Manager.
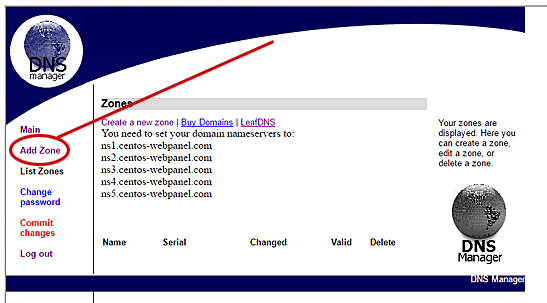
From the Control Panel, click DNS Functions > Free DNS Manager.
At the FreeDNS login page either enter your login details or register - it's free and it takes less than a minute. Once you've registered, you're taken back to the login screen - just login with the details you've just entered, there's no need to wait for a confirmation email (you won't get one !).
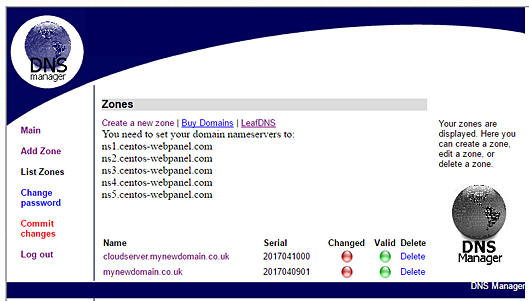
Once you're logged in, you can click on List Zones to confirm that no zones have yet been configured.
Click Add Zone to create the DNS record for the domain associated with your new account.
Enter your domain name and enter the IP address of your vps in the fields for:
- Web Server IP
- Mail Server IP
- FTP Server IP
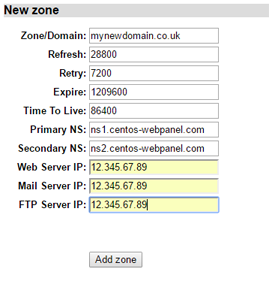
Then click the Add Zone button.
Note that the new zone has been added to your FreeDNS account. Note also that the 'Changed' button is green and the 'Valid' button is black.
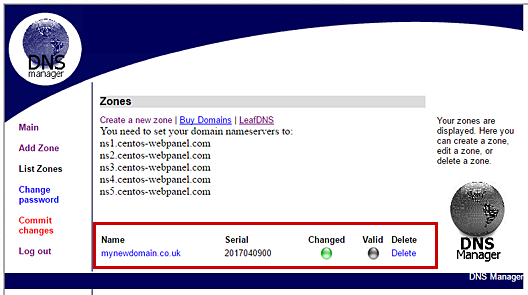
Click the 'Commit changes' link to validate your entries (any errors will be highlighted), then 'List Zones' to confirm all is OK.

While we're here, we are also going to create another zone for the server hostname. Given that the main domain on this installation is mynewdomain.co.uk, I'm going to use a subdomain of this domain as my server's hostname.
So I will create another zone - cloudserver.mynewdomain.co.uk. You can name this anything you want (eg. server, server1, srv1) it really doesn't matter. It doesn't even need to be the same domain name; as long as the nameservers registered to the domain you want to use are ns1.centos-webpanel.com, ns2.centos-webpanel etc.
But for the sake of consistency, I'm using my main domain name.
4. Edit Nameservers IP Addresses
From the Control Panel, click DNS Functions > Edit Nameservers IPs.
Change the IP addresses to those that match the centos-webpanel.com nameservers:
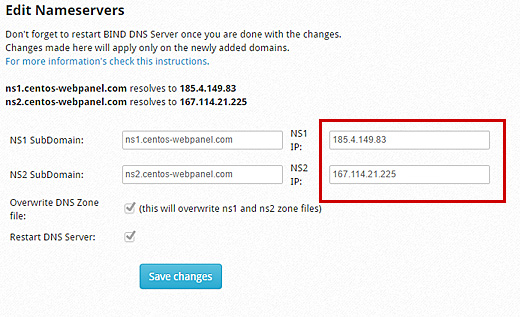
Click Save Changes.
5. Update The DNS Settings With Your Domain Registrar
Log in to your Domain Registrars account (this may or may not be the same as your hosting provider) and find the section for modifying the DNS settings for your chosen domain.
Change the nameservers to:
- ns1.centos-webpanel.com
- ns2.centos-webpanel.com
- ns3.centos-webpanel.com
- ns4.centos-webpanel.com
Please note that although it is often much quicker, it may take up to 48 hours for the changes to DNS settings to propagate fully through the entire domain name system. They do say "patience is a virtue !".
6. Change The Hostname
Go back to your Centos Web Panel page and click on the Dashboard button (top of the navigation menu on the left) the scroll down to the bottom of the page. On the right hand side, you will see that CWP has not picked up the correct Hostname.
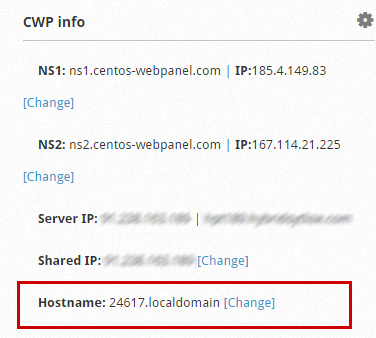
Click the link to change this and set it to the hostname that we chose earlier (cloudserver.mynewdomain.co.uk in this example).
The first thing you will notice is an error message similar to this:
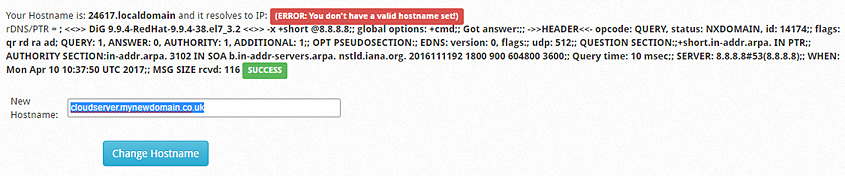
All that is telling you is that the currently registered hostname cannot be found on the internet. So go ahead and change the hostname and click the button. It's possible that you will get this message:
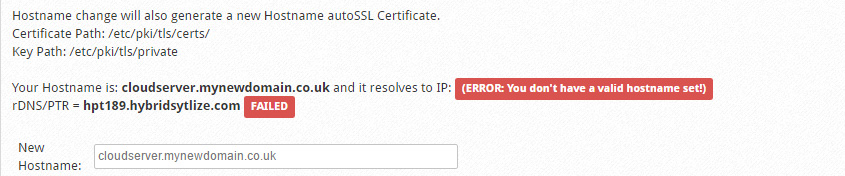
Don't worry about this, it's probably because the zone record that you created earlier hasn't propagated properly yet. Give it a little more time.
With regard to the rDNS (reverse DNS lookup), your hosting provider should be able to help you with that.
7. Set Up FTP Over TLS
This is a more secure way of uploading / downloading files from your server.
The following information has been copied from the HowtoForge article 'How to configure PureFTPd and FileZilla to use TLS sessions on CentOS 7.2'. I have duplicated the information here in order to avoid the need to go to an external resource when using this tutorial and (in part) as an insurance against the HowtoForge tutorial being moved or deleted.
Step 1. Update PureFTPd Configuration
Open /etc/pure-ftpd/pure-ftpd.conf...
Find the TLS section
If you want to allow FTP and TLS sessions, set TLS to 1:
- [...]
- # This option can accept three values :
- # 0 : disable SSL/TLS encryption layer (default).
- # 1 : accept both traditional and encrypted sessions.
- # 2 : refuse connections that don't use SSL/TLS security mechanisms,
- # including anonymous sessions.
- # Do _not_ uncomment this blindly. Be sure that :
- # 1) Your server has been compiled with SSL/TLS support (--with-tls),
- # 2) A valid certificate is in place,
- TLS 1
If you want to accept TLS sessions only (no FTP), set TLS to 2:
- [...]
- # This option can accept three values :
- # 0 : disable SSL/TLS encryption layer (default).
- # 1 : accept both traditional and encrypted sessions.
- # 2 : refuse connections that don't use SSL/TLS security mechanisms,
- # including anonymous sessions.
- # Do _not_ uncomment this blindly. Be sure that :
- # 1) Your server has been compiled with SSL/TLS support (--with-tls),
- # 2) A valid certificate is in place,
- TLS 2
To not allow TLS at all (only FTP), set TLS to 0:
- [...]
- # This option can accept three values :
- # 0 : disable SSL/TLS encryption layer (default).
- # 1 : accept both traditional and encrypted sessions.
- # 2 : refuse connections that don't use SSL/TLS security mechanisms,
- # including anonymous sessions.
- # Do _not_ uncomment this blindly. Be sure that :
- # 1) Your server has been compiled with SSL/TLS support (--with-tls),
- # 2) A valid certificate is in place,
- TLS 0
Then remove the # in front of the following 2 lines:
- TLSCipherSuite HIGH
- CertFile /etc/ssl/private/pure-ftpd.pem
and save the altered configuration file.
Step 2. Create the SSL Certificate for TLS
In order to use TLS, we must create an SSL certificate. In the previous step, we can see that in the default configuration of pure-ftpd the certificate file is named pure-ftpd.pem and it is in the folder /etc/ssl/private/ so we need to create that directory first:
Next, we can generate the SSL certificate as follows:
You will be prompted for the following information:
Country Name (2 letter code) [XX]: <-- Enter your Country Name (e.g., "GB").
State or Province Name (full name) []:<-- Enter your State or Province Name.
Locality Name (eg, city) [Default City]:<-- Enter your City.
Organization Name (eg, company) [Default Company Ltd]:<-- Enter your Organization Name (e.g., the name of your company).
Organizational Unit Name (eg, section) []:<-- Enter your Organizational Unit Name (e.g. "IT Department").
Common Name (eg, your name or your server's hostname) []:<-- Enter the Fully Qualified Domain Name of the system (e.g. "server1.example.com").
Email Address []:<-- Enter your Email Address.
Next we change the permissions of the SSL certificate:
Finally, restart PureFTPd:
That's it. You can now try to connect using your FTP client.
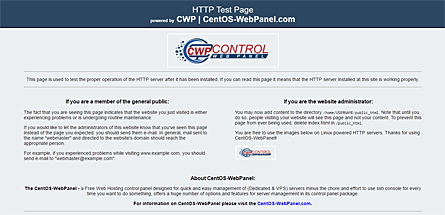
8. Test The User Account is Working Correctly
Once you are able to browse to your new domain and get the Centos Web Panel HTTP Test Page, you can start testing that the system is working as it should.
Log in to the client control panel by browsing to mynewdomain.co.uk:2030 and creating an email address and an ftp account.
Make sure that you can send and receive emails and that you can access the web folders using ftp.
9. Edit php.ini
I have recently had to deal with a code injection hack which generated over 200,000 emails in a few hours. It was a nightmare trying to find what files had been changed or added. This simple change to the php.ini file will add a header to all emails being sent from your server highlighting the user id and file name that generated the emails. This makes it so much quicker and easier stop the attack (there is, of course, lots of other stuff you will need to do to disinfect your server, but this is at least a start).
So, click on PHP Settings > PHP ini Configuration in the menu on the left and scroll down to the end of the file.
Add the following two lines:
- mail.add_x_header = On
- mail.log = /var/log/phpmail.log
Save the file.
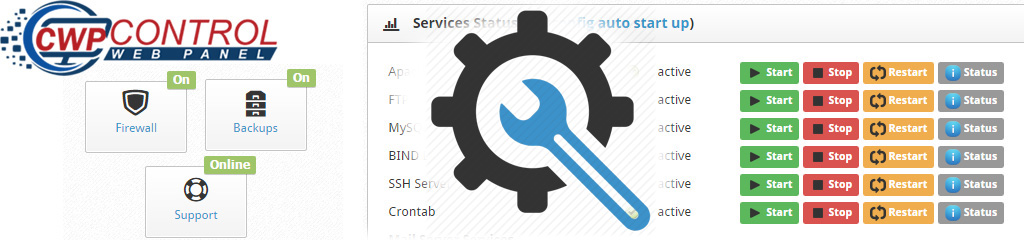
10. Firewall and Mod Security
I have deliberately left these until last. If you have enabled the Firewall and Mod Security modules before testing the basics of your website, you won't know if it is these that are causing the problems or something else.
When you are satisfied that the client control panel, website and emails are working as they should, you can enable the firewall. You should familiarise yourself with the elements covered by the firewall and which settings (if any) that you should change to suit your requirements.
FTP over TLS
We set this up at step 7. But when you switch on the firewall, it prevents you from accessing your files. To enable access, you need to edit the firewall configuration. So go to Security > CSF Firewall. Click the button to edit the configuration file (/etc/csf/csf.conf). Find the section for TCP:
- # Allow incoming TCP ports
- TCP_IN = "20,21,22,25,53,80,110,143,443,465,587,993,995,2030,2031,2082,2083,2086,2087,2095,2096"
- # Allow outgoing TCP ports
- TCP_OUT = "20,21,22,25,53,80,110,113,443,2030,2031,2082,2083,2086,2087,2095,2096,587,993,995"
and add 30000:50000 to the port range like so:
- # Allow incoming TCP ports
- TCP_IN = "20,21,22,25,53,80,110,143,443,465,587,993,995,2030,2031,2082,2083,2086,2087,2095,2096,30000:50000"
- # Allow outgoing TCP ports
- TCP_OUT = "20,21,22,25,53,80,110,113,443,2030,2031,2082,2083,2086,2087,2095,2096,587,993,995,30000:50000"
Save the changes and then Enable or Start the firewall.
Check again that everything is still working as it should.
Then enable the Mod Security module (Security > Mod Security). I have read that the OWASP old rules which come as default with CWP, can cause problems, so I have upgraded to CWP Pro to get access to the Comodo WAF rules which are claimed to be much better.
At the time of writing, CWP Pro is only $10 per year which is closer to my budget than $200 per year for cPanel ! That's a no-brainer for me.
While I hope you have found this newbie guide useful, please do note that this article has been written by a complete novice as a basic guide for the complete novice to get their unmanaged vps up and running. I am not in any way suggesting that following this guidance will provide you with a totally secure environment for hosting or storing your data - it is your responsibility to research and implement the most appropriate security measures for your requirements. You have been warned !
Good luck
Related Articles
Basic Security Measures For Setting Up A CentOS 7 Server

Posted by: Phil Brighton
on Fri 24 Mar 2017
This is number 2 in a series of 4 articles designed to help newbies (like myself) get to grips with managing your own VPS server when you have never done it before. In this article, I'm going to show you some basic security measures you should take before doing anything else with your newly obtained VPS server.
How To Use PuTTY to Access Your Server Using SSH

Posted by: The Curious Website Designer
on Mon 20 Mar 2017
If you have never used SSH to access your VPS, you will probably never have come across PuTTY. This article will put that situation right.
How To Install Centos Web Panel (CWP) On A Centos 7 Server
 On A Centos 7 Server")
Posted by: The Curious Website Designer
on Thu 30 Mar 2017
This is the third in a series of 4 articles aimed at server administrators who have very limited experience. In this article, I will explain how to install CWP on server with Centos 7. The final article will focus on initial configuration of the Web Panel